

I was also not able to cut them as thinly as I should. You really want them paper thin. So they look a lot longer to crisp than the 1 hour spesified in the recipe.


 I am sure you have seen them in coffee shops and chain bakeries. Large lumpy triangle things. I will every once and a while buy one to go with my tea and then am disappointed. They are dry and crumbly with hardly any flavor really just not all that pleasant to eat. So I thought maybe if I made them I could eat them at home with butter and jam and that would be better and so I set out to find a good scone recipe and found that in fact eating them fresh from the oven with jam and tea was much more pleasant.
 1 teaspoon salt
 You can add an egg wash if you would like them to have a nice golden color after baking, sometimes I do, sometimes I don't. I didn't this time. You can also add dried fruit. I love them with 1/2 cup dried cranberries and the zest of about half an orange. That is what is in the ones pictured. The zest is added to the milk and yogurt mixture and the cranberries are added after both the wet and dry have been combined before you turn it out if you are doing so.
 | PUMPKIN BUTTER | |
4 c. cooked pumpkin, mashed (one large can of pumpkin puree) 1 c. apple sauce 1/4 c. honey 1/4 c. brown sugar ~ 2 tbsp cinnamon 1 tsp all spice 1/2 tsp nutmeg 1/4 tsp ground cloves ~ or 3 tbsp pumpkin pie spice  Place pumpkin in a crock pot with out its lid, Dutch oven or heavy kettle. Place over high heat and bring to boil, stirring frequently. Stir in sugar, spice and apple sauce. Continue stirring and let it continue boil until reduced by about one third and darkened as the sugars will caramelized. You will know it is done when the texture is slightly thicker than apple butter but not as dense peanut butter it will stick to the spoon as you tilt it but will not remain if spoon is turn upside down. Remove from heat. Stir well to be sure it is fully blended and let cool. Move to clean storage containers and freeze what you will not use right away. This is not acidic or sweet enough to can with out the risk of botulism and at current there are no approved recipes that are, though in theory you could add more sugar and make it safe, but I am sure this one is not so freeze any extra. | |


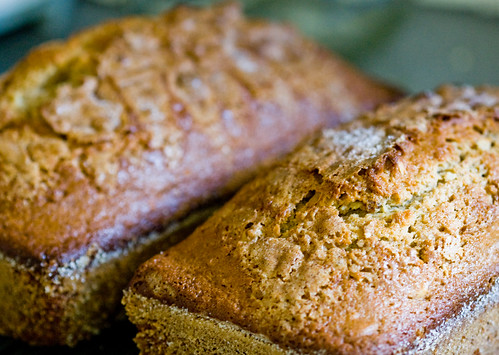 So I was given a starter batch of Amish Friendship bread and instructions I was flabbergasted and flummoxed! The instructions looked like a bad chain letter. They included the insistence that the starter recipe was only known to the Amish and you had to pass the batter on or this wonderful bread would pass out of existence. The final bread recipe also included instant pudding? Well I don't know about you but I am sure the Amish did not use mysticism when they mixed flour, milk, sugar and yeast for the starter batter, nor do they use instant pudding in any fashion. So here is a Starter recipe if you want to make it (its great to have around as its a constant source of baking for you if you don't pass on all the starter batter and helps endear you to neighbors who are usually more than happy to receive free baked goods.)
| Amish Friendship Bread | |
| 2/3 cup oil 1/2 milk 3 eggs 1/2 tsp. salt 1 tsp. vanilla 1 to 1 1/2 tsp. cinnamon 1 cup sugar 2 cups flour 1 1/4 tsp. baking powder 1/2 tsp. baking soda Mix ingredients well. You can add 1 cup raisins and 1 cup nuts (optional). Grease two loaf pans with butter, sprinkle with sugar instead of flour. Bake at 325 degrees F for 45 minutes to 1 hour (individual oven temperatures vary). Cool 10 minutes, remove from pans. Makes two loaves of Amish Friendship Bread. you can make it in single bunt pan if you happen to have lent your second bread pan to someone and so only have one on hand. | |
| Amish Friendship Bread Starter | |
1 pkg. active dry yeast 1/4 cup warm water (110°F) 1 cup all-purpose flour 1 cup white sugar 1 cup warm milk (110°F) 1. In a small bowl, dissolve the yeast in warm water for about 10 minutes. Stir well. 2. In a 2 quart glass or plastic container, combine 1 cup sifted flour and 1 cup sugar. Mix thoroughly or the flour will get lumpy when you add the milk. 3. Slowly stir in warm milk and dissolved yeast mixture. Loosely cover the mixture with a lid or plastic wrap. The mixture will get bubbly. Consider this Day 1 of the cycle, or the day you receive the starter. For the next 10 days handle starter according to the instructions above for Amish Friendship Bread. | |
 For those of you who have noticed my To do list make bread has been on there for a while I can take it off finally! I made three different types of beer bread but first the basics. Beer bread relies on the yeast in the beer to rise. This produces a good soft bread with a sticky batter similar to banana bread and so it needs a bread pan too cook in. I altered the recipes I found some by adding a little dry active yeast to the beer and a lot more flour to get a more typical kneadable bread.
 Thanks for visiting!


 This one I filled with the azuki and was probably my favorite. I love azuki and make my own from kidney beans. As this was the first of the filled that I tried today I simply made it round as it was easy to manage while I got the feel for the rice. The nori is shaped like flowers, as nori comes in stiff sheets like paper and so can be cut with scrap booking paper punches to dress up the onigiri.
 This is made with the omelet. The omelet is made very thick by western standards then cut into cubes or rectangular prisms. I wanted the omelet to be visible from the out side so it was shaped in a flattish circle rather a full sphere. This technique is really lovely when the filling has a bright color as well a red or green really pops against the rice.
 japanese flavores but appeals to the Maryland palet. The really nice thing about the crab I used also is that it was a white and sitcky filling so I could over fill and risk having the filling mix with the rice with out it showing through the rice or causeing the onigiri to crumble. The nori is cut with a scrap booking paper punch just as the flowers for the azuki onigiri were.
 The chicken teriyaki onigiri showed its filling the way the omlete did however it was shaped into a triangle. It also has sesame seeds. I would have much prefered black sesame seeds for the visial contrast. If I had more time or forethought I would have toasted the sesame seeds in a dry frying pan, this would serve to both bring out the flavor as well as to darken there color.
| BASIC PASTA DOUGH | |
1 cup flour 1 egg 1/4 tsp. salt 1 tsp. olive oil warm water Make a well with 3/4 of the flour; add salt and egg to the well and mix together slowly, adding oil then water as necessary. Knead about 10 minutes; cover and let dough rest for 10 minutes, then knead again until very smooth. It can now be put through a roller or simply rolled by hand. | |

